Vampire Rainbow Swirl Bread Recipe
Introduction
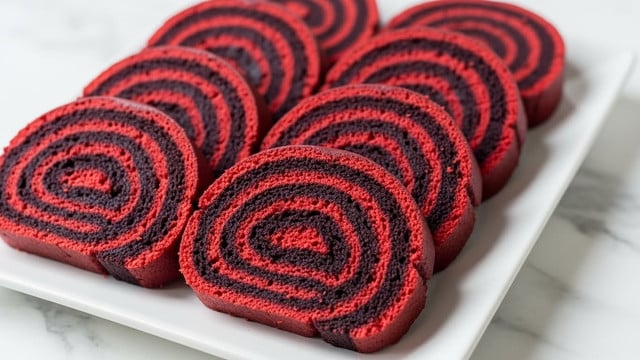
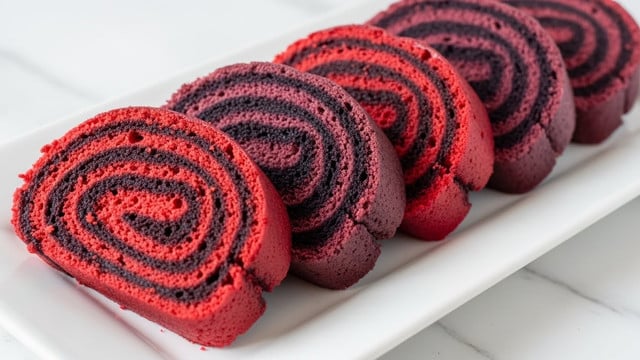
Vampire Bread is a fun and colorful twist on traditional homemade bread, perfect for festive occasions or just adding some spooky flair to your table. This soft, layered loaf features vibrant red and black swirls that look both eye-catching and delicious.
Ingredients
- 1 cup hot reduced fat milk
- 1 egg yolk
- 3 cups all-purpose flour
- 2 1/2 tablespoons sugar
- 2 1/4 teaspoons active dry yeast
- 1 1/2 tablespoons butter
- 1 teaspoon salt
- Black and red food coloring
Instructions
- Step 1: In a small bowl, whisk together the hot milk and egg yolk. Microwave for 25 to 30 seconds and set aside.
- Step 2: In a large bowl or the base of a stand mixer, whisk together the flour, sugar, and active dry yeast. Add the milk and egg mixture, butter, and salt. Stir to combine.
- Step 3: Knead the dough by hand for about 10 minutes or with a stand mixer’s dough hook for about 5 minutes until smooth and elastic.
- Step 4: Divide the dough into 2 or 3 pieces and place each in separate small bowls. Cover with a tea towel.
- Step 5: Remove each bowl of dough one at a time and knead in black or red food coloring, as desired.
- Step 6: Cover the colored dough pieces again and let them rise until doubled, about 1 1/2 hours.
- Step 7: Punch down the dough and transfer to a lightly floured surface. Divide each colored dough into four portions.
- Step 8: Roll each portion into an 8×4 inch rectangle. Layer the rectangles on top of each other in any order you like to create colorful layers.
- Step 9: Lightly grease a 9×5 inch loaf pan or line it with parchment paper. Roll the layered dough tightly from the short end into a loaf and place it in the pan.
- Step 10: Cover the loaf with a tea towel and let it rise again until doubled in size, about 1 hour.
- Step 11: Preheat the oven to 375°F (190°C). Remove the towel and bake the bread for about 30 minutes or until fully cooked.
- Step 12: Remove the bread from the oven and let it cool completely before slicing into 12 pieces.
Tips & Variations
- For an easier method, you can prepare the dough using a bread machine’s dough cycle, then continue with coloring, layering, and baking as described.
- Adjust food coloring amounts gradually to achieve the intensity of color you prefer without altering the dough texture.
- Try other colors or ombre effects by layering more colored doughs or mixing colors for unique patterns.
Storage
Store the bread wrapped in plastic wrap or in an airtight container at room temperature for up to 3 days. For longer storage, freeze slices in a sealed bag for up to 1 month. Reheat slices in a toaster or oven for best results.
How to Serve
Serve this delicious recipe with your favorite sides.
FAQs
Can I use whole milk instead of reduced fat milk?
Yes, whole milk works just as well and can add a slightly richer flavor to the bread.
Will the food coloring affect the taste of the bread?
No, food coloring is typically flavorless and will not alter the taste of the bread, only the appearance.
PrintVampire Rainbow Swirl Bread Recipe

Vampire Bread is a visually striking, colorful loaf made by layering dyed dough before baking. This soft and slightly sweet yeast bread features swirls of black and red dough that create a dramatic effect, perfect for Halloween or themed parties. The bread is prepared with a classic yeast dough enriched with reduced fat milk, butter, and egg yolk, then colored with food coloring and baked to perfection. It can be kneaded by hand, with a mixer, or prepared in a bread machine for convenience.
- Prep Time: 20 minutes
- Cook Time: 30 minutes
- Total Time: 3 hours 20 minutes
- Yield: 12 slices 1x
- Category: Bread
- Method: Baking
- Cuisine: American
Ingredients
Main Ingredients
- 1 cup hot reduced fat milk
- 1 egg yolk
- 3 cups all-purpose flour
- 2 1/2 tablespoons sugar
- 2 1/4 teaspoons active dry yeast
- 1 1/2 tablespoons butter
- 1 teaspoon salt
- Black food coloring
- Red food coloring
Instructions
- Mix Milk and Egg: In a small bowl, whisk together the hot reduced fat milk and the egg yolk to combine well.
- Warm Mixture: Place the bowl in the microwave for 25-30 seconds to slightly warm the mixture, then set aside.
- Combine Dry Ingredients: In a large bowl or the base of a stand mixer, whisk together the all-purpose flour, sugar, and active dry yeast.
- Add Wet Ingredients: Add the warmed milk and egg mixture, butter, and salt to the flour mixture. Stir to combine into a dough.
- Knead the Dough: Knead by hand on a floured surface for about 10 minutes, or use the hook attachment on a stand mixer and knead for approximately 5 minutes until smooth and elastic.
- Divide Dough: Separate the dough into 2 to 3 equal portions, placing each into its own small bowl, then cover with a tea towel to prevent drying.
- Color the Dough: Remove one dough portion at a time and knead in desired amounts of black or red food coloring using your hands or a spatula until fully colored.
- First Rise: Cover the colored dough pieces again with a tea towel and allow them to rise until doubled in size, approximately 1 1/2 hours.
- Punch Down Dough: Once risen, punch down the dough to release air, then transfer to a lightly floured surface.
- Prepare Dough Layers: Divide the dough evenly into four portions. Drop food coloring onto each portion as desired for additional color layering. Roll each piece into an 8×4 inch rectangle.
- Layer Dough: Stack the rolled rectangles over one another in a color order of your choice to create the layered look.
- Form the Loaf: Lightly coat a 9×5 inch loaf pan with non-stick baking spray or line with parchment paper. Roll the stacked dough tightly from the short end into a loaf shape and place it into the prepared pan.
- Second Rise: Cover the loaf with a tea towel and let it rise again until doubled, about 1 hour.
- Preheat Oven: When the dough has risen, preheat the oven to 375°F (190°C) and remove the tea towel from the loaf.
- Bake: Bake the loaf in the oven for about 30 minutes or until fully cooked through and golden brown on top.
- Cool and Slice: Remove the bread from the oven and allow it to cool completely in the pan before slicing into 12 pieces to preserve the internal swirled colors.
Notes
- Use reduced fat milk warmed but not hot to activate the yeast without killing it.
- Ensure the dough is kneaded until smooth and elastic for best texture.
- Food coloring can be adjusted for intensity; gel colors provide vibrant hues without thinning the dough.
- Letting the dough rise fully twice ensures a tender and well-risen bread.
- Cool completely before slicing to maintain the defined colored layers inside.
- You may use a bread machine’s dough cycle for convenience, but the layered color step should still be done by hand before the final rise and baking.
- The loaf pan size is important to maintain shape; adjust baking time slightly if using different pans.
Keywords: Vampire Bread, colored bread, layered bread, Halloween bread, yeast bread, festive bread