No Bake Grinch Pie Recipe
Introduction
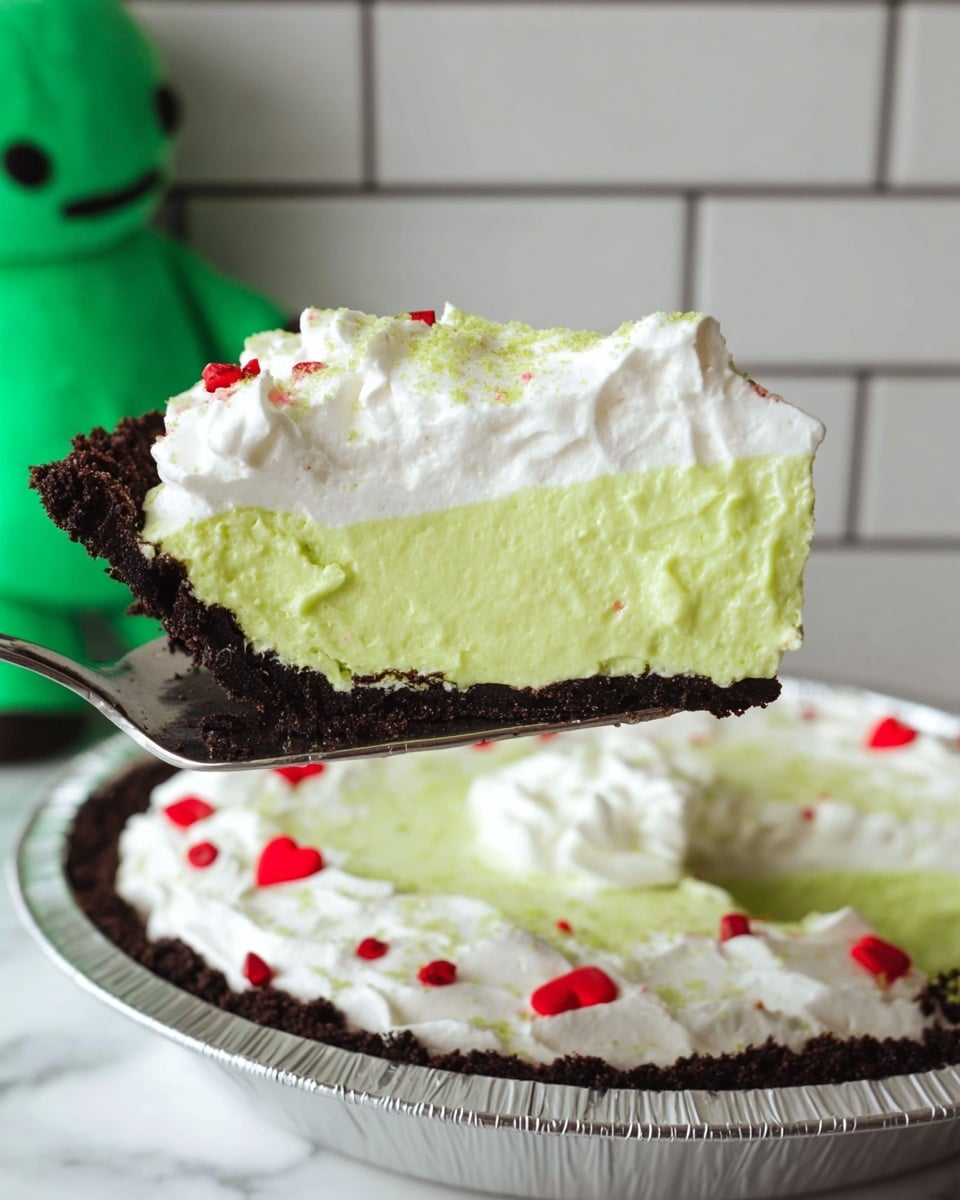
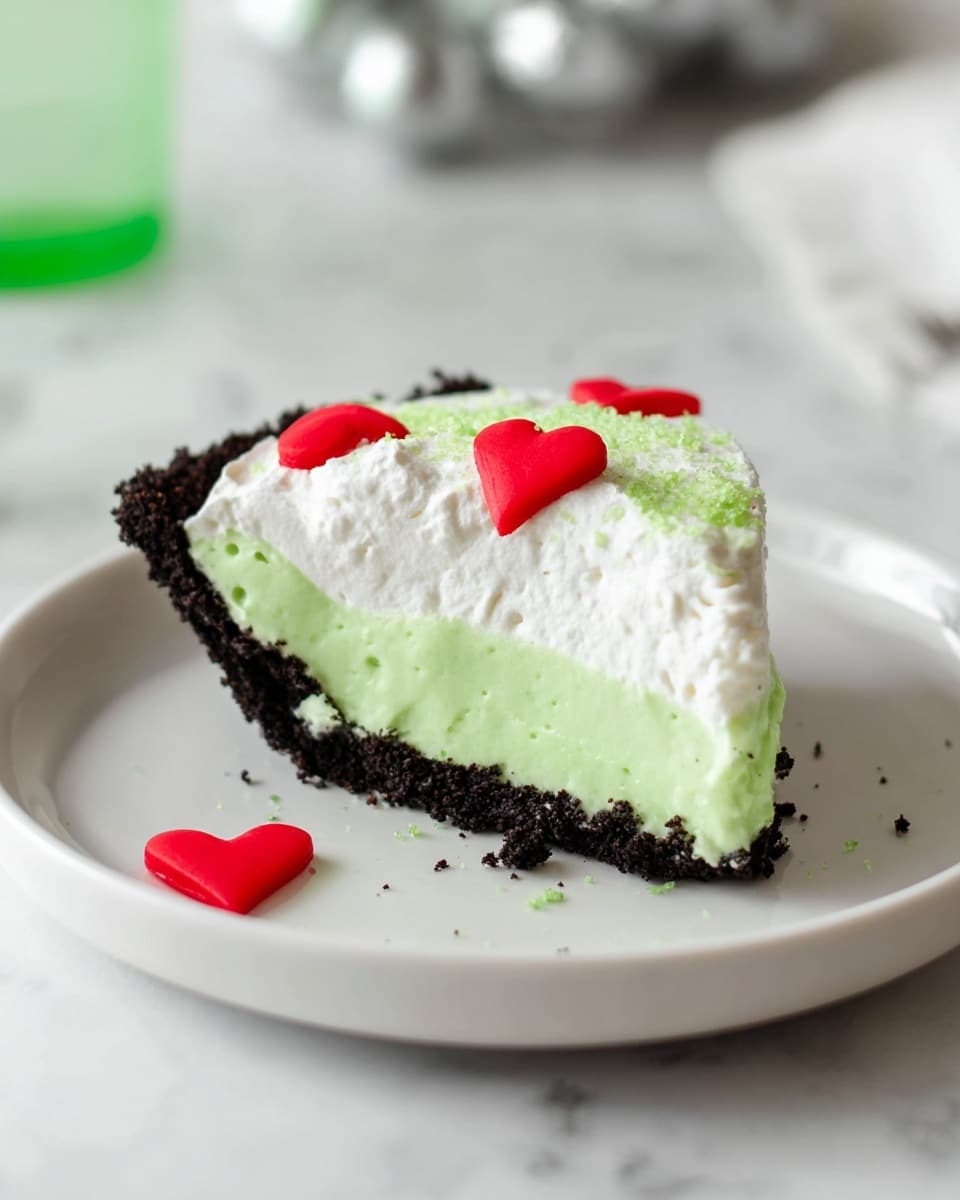
This No Bake Grinch Pie is a festive and fun dessert that’s perfect for the holiday season. With its vibrant green color and sweet, creamy texture, it’s sure to bring a smile to everyone at your table. Plus, it’s quick and easy to make—no oven required!
Ingredients
- 1 Oreo pie crust
- 1 box white chocolate pudding (3.9 oz)
- 2 cups 2% milk (cold)
- ½ container Cool Whip
- 2-3 drops neon green gel food coloring
- 1-2 drops green food coloring
- ½ cup green sanding sugar
- ½ cup mini red heart sprinkles
- ½ cup large red heart sprinkles
Instructions
- Step 1: Prepare the white chocolate pudding according to the package directions, adding the milk and both green food colorings. Beat until the mixture sets and forms soft peaks with a bright green color.
- Step 2: Spoon the pudding evenly into the Oreo pie crust, smoothing the top with a spatula.
- Step 3: Refrigerate the pie for at least 3 hours to allow the pudding to fully set.
- Step 4: Once chilled, remove the pie from the fridge and spread the Cool Whip evenly on top.
- Step 5: Sprinkle the green sanding sugar and mini red heart sprinkles over the Cool Whip layer.
- Step 6: Before serving, garnish each slice with one large red heart sprinkle for a festive touch.
- Step 7: Slice, serve, and enjoy this sweet, colorful holiday treat!
Tips & Variations
- Use whipped cream instead of Cool Whip for a fresh homemade topping.
- Adjust the food coloring to make the green shade lighter or darker according to your preference.
- Try adding crushed Oreo pieces on top for extra texture and flavor.
- Substitute the Oreo crust with a graham cracker crust for a milder base.
Storage
Store the pie covered in the refrigerator for up to 3 days. If the decorations lose their sparkle, add fresh sprinkles before serving. To reheat, no warming is needed—serve chilled for the best flavor and texture.
How to Serve
Serve this delicious recipe with your favorite sides.
FAQs
Can I make this pie ahead of time?
Yes, this pie can be prepared up to a day in advance. Just keep it refrigerated until ready to serve.
What if I don’t have neon green gel food coloring?
You can use regular green food coloring alone, but the neon gel adds a brighter, more vibrant color typical of the Grinch theme.
PrintNo Bake Grinch Pie Recipe

This No Bake Grinch Pie is a festive and fun dessert perfect for holiday celebrations. Featuring a rich Oreo cookie crust filled with vibrant green white chocolate pudding, this pie is topped with cool-whip and colorful red and green sprinkles to evoke the mischievous holiday spirit of the Grinch. Quick to prepare and requiring no baking, it’s a visually striking dessert that’s both delicious and delightfully creamy.
- Prep Time: 15 minutes
- Cook Time: 0 minutes
- Total Time: 3 hours 15 minutes
- Yield: 8 servings 1x
- Category: Dessert
- Method: No-Cook
- Cuisine: American
- Diet: Vegetarian
Ingredients
Pie Crust
- 1 Oreo pie crust
Filling
- 1 box white chocolate pudding mix (3.9 oz)
- 2 cups 2% milk, cold
- 2–3 drops neon green gel food coloring
- 1–2 drops green food coloring
Toppings
- ½ container Cool Whip
- ½ cup green sanding sugar
- ½ cup mini red heart sprinkles
- ½ cup large red heart sprinkles
Instructions
- Prepare the Pudding: In a mixing bowl, combine the white chocolate pudding mix with 2 cups of cold 2% milk. Add 2-3 drops of neon green gel food coloring and 1-2 drops of green food coloring. Beat the mixture according to the pudding package instructions until it thickens and forms soft peaks.
- Fill the Pie Crust: Spoon the prepared green pudding evenly into the Oreo pie crust, smoothing the top for an even layer.
- Chill the Pie: Refrigerate the pie for 3 hours to allow the pudding to set firmly.
- Add Toppings: After chilling, remove the pie from the refrigerator and spread a layer of Cool Whip over the top evenly.
- Decorate: Sprinkle green sanding sugar and mini red heart sprinkles generously over the Cool Whip. Just before serving, top each slice with a single large red heart sprinkle for a festive touch.
- Serve: Slice the pie and serve chilled. Enjoy this colorful, no-bake Grinch-inspired dessert!
Notes
- Using cold milk helps the pudding set properly and achieve the right texture.
- Adjust the amount of green food coloring to achieve your desired shade of green.
- Ensure the pudding is fully set by refrigerating for at least 3 hours for best results.
- The pie is best served chilled and consumed within 2 days for freshness.
- For a dairy-free option, substitute Cool Whip and milk with suitable alternatives.
Keywords: No Bake Pie, Grinch Pie, Holiday Dessert, Oreo Crust, White Chocolate Pudding, Festive Pie