How to Make a Raspberry Curd Recipe
Introduction
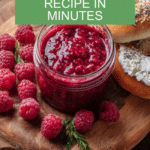
Raspberry curd is a vibrant, tangy spread that’s perfect for adding a burst of fresh flavor to your breakfasts and desserts. Made with fresh raspberries, lemon juice, and silky butter, this smooth curd is easy to prepare and incredibly versatile.

Ingredients
- 2 ½ cups (12 ½ oz/355 g) raspberries (fresh or defrosted)
- ¼ cup (2 fl oz/60 ml) lemon juice
- ½ cup (4 oz/115 g) granulated sugar
- ⅓ cup (2½ oz/71 g) granulated sugar
- 1 large egg (at room temperature)
- 2 large egg yolks (at room temperature)
- 1 tablespoon cornstarch
- 6 tablespoons (3 oz/85 g) butter (diced)
Instructions
- Step 1: Using a high-power blender, blend the raspberries and lemon juice until smooth. Strain the mixture through a sieve into a medium saucepan to remove seeds.
- Step 2: Place the saucepan over medium heat and add ½ cup (4 oz/115 g) of sugar. Whisk occasionally until the sugar dissolves and the mixture begins to simmer.
- Step 3: In a heat-proof bowl, whisk together the remaining ⅓ cup (2½ oz/71 g) of sugar, whole egg, egg yolks, and cornstarch until fully combined.
- Step 4: Remove the raspberry mixture from heat and slowly pour it into the egg mixture while whisking vigorously to prevent curdling.
- Step 5: Return the combined mixture to the saucepan. Cook over low heat, whisking constantly, until the curd thickens—about 3 minutes. Strain immediately to remove any solids.
- Step 6: Add the diced butter to the hot curd and whisk until fully incorporated and smooth.
- Step 7: Press a piece of plastic wrap directly onto the surface of the curd to prevent a skin from forming. Let it cool to room temperature, then refrigerate.
Tips & Variations
- For a seedless curd, always strain the raspberry puree thoroughly before cooking.
- Use room temperature eggs to ensure a smooth, lump-free curd.
- Swap raspberries for other berries like blueberries or blackberries for different flavor variations.
- Add a teaspoon of vanilla extract after cooking for a subtle sweetness.
Storage
Store raspberry curd in an airtight container in the refrigerator for up to 5 days. To serve, let it come to room temperature or warm gently. Avoid freezing, as the texture may change.
How to Serve
Serve this delicious recipe with your favorite sides.
FAQs
Can I use frozen raspberries for this recipe?
Yes, defrost frozen raspberries before blending to ensure they puree smoothly and lose excess liquid.
How do I know when the curd is thick enough?
The curd is ready when it coats the back of a spoon and holds its shape when stirred. This usually takes about 3 minutes on low heat with constant whisking.
PrintHow to Make a Raspberry Curd Recipe

This Raspberry Curd recipe is a luscious, tangy spread made from fresh raspberries, lemon juice, sugar, eggs, and butter. Perfectly smooth and thickened to creamy perfection, it is ideal for spreading on scones, biscuits, or using as a filling for pies and tarts. The curd is made using stovetop cooking and careful whisking to achieve the perfect texture.
- Prep Time: 10 minutes
- Cook Time: 15 minutes
- Total Time: 25 minutes
- Yield: About 1 ½ cups (375 ml) of raspberry curd 1x
- Category: Sauce / Spread
- Method: Stovetop
- Cuisine: British
- Diet: Vegetarian
Ingredients
Fruit Mixture
- 2 ½ cups (12 ½ oz/355 g) raspberries (fresh or defrosted)
- ¼ cup (2 fl oz/60 ml) lemon juice
Curd Base
- ½ cup (4 oz/115 g) granulated sugar
- ⅓ cup (2½ oz/71 g) granulated sugar
- 1 large egg (at room temperature)
- 2 large egg yolks (at room temperature)
- 1 tablespoon cornstarch
Finishing
- 6 tablespoons (3 oz/85 g) butter (diced)
Instructions
- Puree the Raspberries: Using a high-power blender, blend the raspberries and lemon juice until completely pureed. Pass the mixture through a sieve into a medium saucepan to remove seeds and achieve a smooth texture.
- Cook the Fruit Base: Place the saucepan over medium heat and add ½ cup (4 oz/115 g) of granulated sugar. Whisk occasionally until the sugar is fully dissolved and the puree starts to simmer.
- Prepare the Egg Mixture: In a heat-proof bowl, whisk together the remaining ⅓ cup (2½ oz/71 g) of granulated sugar, whole egg, egg yolks, and cornstarch until the mixture is smooth and well combined.
- Temper the Eggs: Once the raspberry puree starts simmering, remove it from heat. Slowly pour the hot puree into the egg mixture while whisking vigorously to temper the eggs and prevent curdling.
- Cook the Curd: Return the combined mixture to the saucepan. Turn the heat to low and cook while whisking constantly. Continue until the curd thickens, about 3 minutes. Immediately strain the curd through a fine sieve to remove any solids for a silky smooth curd.
- Add Butter: Add the diced butter to the hot curd and whisk until fully incorporated and the curd is glossy and smooth.
- Cool and Store: Place a piece of plastic wrap directly on the surface of the curd to prevent a skin from forming. Allow it to cool to room temperature, then refrigerate in an airtight container. It will keep for up to 5 days.
- Enjoy: Use this raspberry curd on scones, biscuits, or as a filling in pies such as a Mile-High Raspberry Meringue Pie for a delicious burst of fresh raspberry flavor.
Notes
- For best results, use ripe fresh or well-thawed frozen raspberries.
- Tempering the eggs prevents them from scrambling when combined with hot puree.
- Straining the curd is key to removing seeds and ensures a smooth final texture.
- Make sure the eggs are at room temperature for better blending and smoother texture.
- The curd can also be frozen for longer storage; thaw in the refrigerator before use.
- Use high-quality butter for the richest flavor and smoothest finish.
Keywords: Raspberry curd, raspberry spread, fruit curd, easy curd recipe, stovetop curd, homemade jam alternative, dessert filling, scone topping